


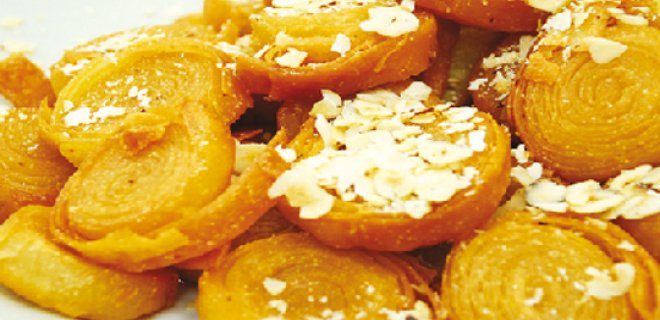
There is a specific kind of comfort in a syrup-soaked dessert. It is heavy. Sweet. Designed to be shared during holidays or celebrated with a quiet cup of tea on a Sunday afternoon. If you have ever wondered how to make şerbetli bayram tatlıları at home, the Rulo Katmer is a brilliant place to start. It is not the most complex baklava you will ever encounter. You do not need a phyllo dough specialist’s patience. But it does demand respect for the syrup and the layers.
The magic here lies in the balance between the dough’s texture and the liquid it absorbs. Get the syrup right, and you get a dessert that tastes like celebration. Get it wrong, and you have a soggy mess. Let’s look at the components. You need precision, but not rigidity.
The Dough: Simple and Elastic
The base of Rulo Katmer is deceptively simple. It relies on three pillars: yogurt, eggs, and enough flour to hold it together without turning into a brick. The yogurt provides tang. The eggs provide structure. The semolina (irmik) adds a subtle grit that distinguishes this from a standard pastry.
Here is what you need to gather before you heat anything up:
- 1 cup of plain yogurt
- 2 eggs
- 2 tablespoons of semolina
- 2 tablespoons of vegetable oil
- 1 teaspoon of baking soda (karbonat)
- Flour, as much as your dough needs
- 2 tablespoons of butter (for brushing or mixing, depending on your method)
Start with the wet ingredients. Whisk the yogurt and eggs together until they are uniform. Add the semolina and the oil. Stir. Then comes the baking soda. It needs to be evenly distributed. If you clump it, you get metallic bites.
Now, the flour. Do not measure it all at once. Add it gradually. You are looking for a dough that is soft but not sticky. It should pull away from the sides of the bowl. If it sticks to your fingers, add a little more flour. If it cracks when you press it, add a splash of water or a bit more yogurt.
The key to a good katmer dough is elasticity. It should stretch thin without tearing. If it snaps back, let it rest. Give it ten minutes. The gluten needs to relax.
The Syrup: Timing is Everything
A syrup-based dessert is defined by temperature contrast. Hot dough on cold syrup. Or cold dough on hot syrup. The traditional Rulo Katmer usually involves pouring the syrup over the baked pastry. This means the syrup must be at room temperature or slightly cool when it hits the hot tray.
For the şerbet, you need:
- 4 cups of granulated sugar
- 2.5 cups of water
- 1 slice of lemon
Combine the sugar and water in a saucepan. Bring it to a boil. Once it bubbles, add the lemon slice. The acid prevents crystallization. It keeps the syrup clear and fluid. Let it simmer for about 15 to 20 minutes. You want it to thicken slightly. It should coat the back of a spoon.
Remove it from the heat
The Art of the Hyrmae Sweet Layering and Prep
Let’s be honest, most people skip the hard part. They want the result without the ritual. But Hyrmae isn’t just a sweet; it’s a test of patience. You start with the syrup. Sugar, lemon, and water hit the pot, you boil it, then you step away. Let it cool. If you rush this, the sweet hits too hard and masks everything else. Patience is your first ingredient.
While that cools, you tackle the dough. Yogurt, oil, baking soda, eggs. Whisk them until they’re friends. Then comes the dry stuff. Semolina and flour. You’re not aiming for a stiff ball. You want something that feels like an earlobe. Soft. Yielding.
Roll it out thin. Thin enough to see through, maybe. Brush it with melted butter. Not too much, but enough to glue the layers. Roll it tight into a log. Pinch the seam shut. Flip it so the seam is on the bottom. Tuck it in the fridge for fifteen minutes. This isn’t optional. Cold dough holds its shape when you cut it. Room temperature dough turns into a greasy mess.
Take it out. Slice it into strips about the width of your pinky finger. Drop them into hot oil. Fry until golden. Then, immediately into the cold syrup. Listen for that hiss. That’s the sound of the pastry drinking up the sweetness. Drain it. Top with almonds, filberts, or pistachios. Or go traditional with the coconut and green pistachio finish.
The Whipped Cream Core
The syrup is just the shell. The soul is the muhallebi. You’re looking for a cream that’s rich but not cloying. Two cups of milk in a pot. Add two and a half tablespoons of flour, a packet of vanilla, and a cup of sugar. Stir constantly. Don’t let the bottom burn. Once it thickens, take it off the heat. Stir in a hundred grams of butter until it melts into the cream. Add a touch of starch if you need it to set firmer. Let it cool completely before you stack it.
Building the Structure
This is where the magic happens. You don’t just pile ingredients. You engineer them.
- The Base: Start with a layer of the fried dough pieces in your serving dish. They act as the crunchy foundation.
- The Cream: Spread the cooled muhallebi over the dough. Smooth it out.
- The Syrup: Pour the cooled syrup over the cream. It will soak down through the layers, binding everything together.
- The Garnish: This is your chance to play. Coconut flakes for texture. Crushed green pistachios for color. Or if you’re feeling fancy, slivered almonds.
Why This Specific Ratio Matters
You might wonder why the recipe calls for specific measurements like half a cup of olive oil versus tereyağı. It’s about flavor balance. Olive oil adds a fruity depth that cuts through the sugar. Tereyağı (butter) adds the richness. Too much butter and it’s heavy. Too little and it’s dry. The vinegar in the dough? It helps the baking soda activate, giving you a
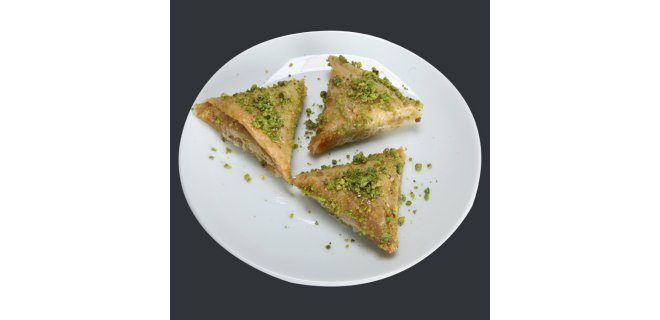

The Art of Shaping Mediterranean Pastry: A Step-by-Step Guide
Making these traditional sweets is less about rigid precision and more about feeling the dough. It is tactile. You need to understand how the flour absorbs the liquid. If you rush, the texture suffers. If you wait too long, the filling dries out. The goal is a tender crumb with a crisp exterior.
Crafting the Muhallebi Filling
Start with the heart of the pastry. The filling needs to be thick. Thin filling makes the pastry soggy before it even hits the oven.
Combine flour, milk, sugar, and vanilla in a pot. Stir constantly. Do not look away. You are cooking until the mixture pulls away from the sides of the pan. It should be a dense, creamy paste. Not liquid. Not dry. Just right. If it is too thin, it will leak. If it is too thick, it will crack.
Preparing the Sweet Syrup
While the filling sets, turn your attention to the syrup. The ratio matters here. Equal parts water and sugar is a safe baseline for most Turkish desserts.
Bring them to a boil in a pot. Once it bubbles, let it cook for five more minutes. This allows the sugar to fully integrate and the water to evaporate slightly. Then, take it off the heat. Let it cool. Warm syrup is better than hot syrup for most pastries because it absorbs evenly without turning the dough into mush immediately.
Mixing the Dough: The Earlobe Test
This is where the technique really shines. You are building a dough that is both pliable and strong.
In a bowl, mix milk, olive oil, water, and melted butter. These fats provide richness and tenderness. Add two tablespoons of flour to this wet mixture first. This helps distribute the liquid. Then, add vinegar and lemon juice. The acid strengthens the gluten slightly while keeping the dough tender.
Now, add flour gradually. Stop when the dough reaches the consistency of an earlobe. That is the old baker’s trick. It should be soft. It should spring back when pressed. If it is sticky, add a sprinkle of flour. If it is dry, add a drop of water.
Roll the dough out on a surface dusted with starch. Starch prevents sticking better than flour for thin sheets. Roll it thin. Not paper-thin, but thin enough that the layers will crisp up.
Shaping the Pastries
Cut the sheet into strips. About four fingers wide is a good rule of thumb. Cut these strips in half lengthwise. You now have long, narrow ribbons of dough.
Place a small amount of the cooled muhallebi at one end of each strip. Fold the dough over the filling in a spiral motion. It looks like a musk box. The shape is key. It traps the steam inside, cooking the filling gently while the outside crisps.
Place them on a greased baking tray. The closed seam should face down. This seals the pastry shut. Brush the tops with melted butter. This is what gives them that golden, flaky finish.
Baking and Final Assembly
Preheat your oven to 180°C. Do not skip this step. A cold oven ruins the rise.
Bake until they are golden brown. This takes about 20-25 minutes,
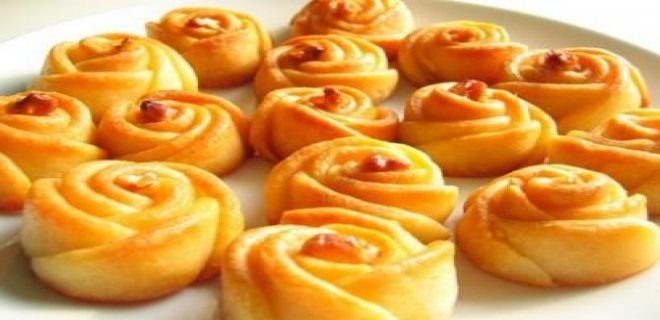
The Mechanics of the Cut
Start simple. Dissolve the yeast in a splash of water. Just enough to wake it up.
Get a bowl ready. Drop the yeast in. Create a well in the center. Crack an egg into that void. Add the margarine, but only if it’s been sitting out at room temperature. Cold fat doesn’t mix. It clumps.
In a separate container, whisk the flour with sugar and salt. Sprinkle in the bulgur. It adds texture. It changes how the dough behaves.
Now, the marriage. Mix the wet ingredients inside that well first. Then, pull the dry flour from the edges toward the center. Don’t dump it all in at once. Pull it in.
Knead until the dough feels like a earlobe. Soft. Supple. Not sticky. Not stiff. That’s the benchmark.
Roll it out. Half a centimeter thick. Not too thin. Not too thick. Use a tea glass as your stamp. Cut circles.
Here’s the detail that matters. Take a knife. Make slits in the center of the circle. Cut them out toward the edges.
Leave two fingers’ width between each slit.
Why do this? The heat needs a path. The steam escapes. The pastry puffs up correctly instead of bursting unpredictably. It’s not just decoration. It’s physics.
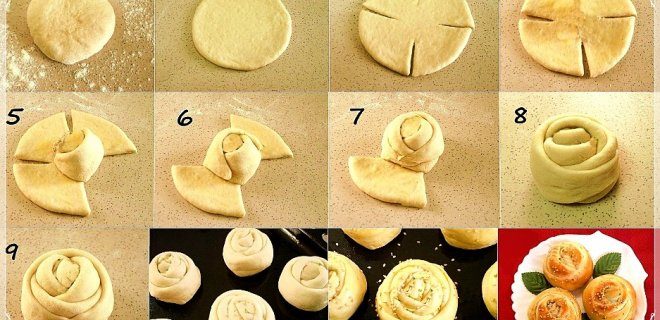
Assembly and Baking
It’s all about the fold now. Take those dough pieces that look like little leaves and press the edges together. You want them to trap whatever is inside, sealing it shut so nothing escapes into the oven.
Slide them onto a baking sheet you’ve just greased. A little oil or butter goes a long way in preventing sticking.
The Heat and The Soak
Pop the tray into a preheated 180-degree oven. The heat needs to work fast here, crisping up the exterior while cooking the filling through.
While they bake, get that syrup ready. Boil the ingredients together until it’s a hot, thin liquid. You don’t want it thick yet; it needs to flow.
Resting for Success
The moment the tray comes out of the oven, pour the syrup over the hot pastries. Yes, hot onto hot. It sounds risky if you aren’t used to it, but it’s the secret to the texture.
Let them sit. Don’t rush this. The dough needs time to pull that liquid in. If you cut into it too soon, it’ll be dry and crumbly. Wait until the syrup is fully absorbed. The texture should shift from brittle to tender.
The best results come from patience. Letting the pastry rest ensures the flavor penetrates every layer.
Garnish if you feel like it. Pistachios, cinnamon, or a simple dusting of powdered sugar. It’s optional, but it looks nice.
Serve. Eat. Repeat.

